Wednesday, September 30, 2009

2 New Cards

Dawn McVey posted a new Raspberry Suite challenge yesterday. Here are the colors:

These colors are really amazing together! The red really adds some pop! I may have to use these again sometime!

Because I am really not that creative, I needed a sketch to go along with these, so I decided to use the Taylored Expressions sketch this week:


Here is my take:

I just love the Papertrey Ink Everyday Button Bits set. The images and sentiments are so versatile! I punched the edging with the Martha Stewart Lace Punch. That punch has become a staple that I go to often.

I added some swirls with little red gems for some extra bling!

While I had all of these pieces of cardstock out, I made a winter card as well:

This card is very similar to one I made a few weeks ago, but with a slightly different color pallet.

That little snowman is so cute! The snowman and the snowflakes on top are from the Cricut Doodlecharms cartridge.

Thanks so much for Looking!

Monday, September 28, 2009

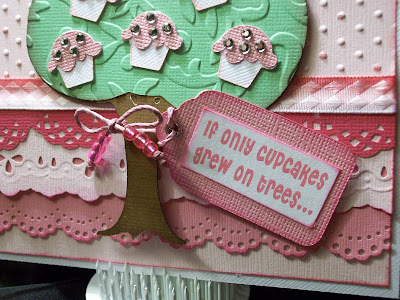
If Cupcakes Grew on Trees...

I set my own personal record today - 8 challenges with 1 card:


Challenges:
Pile It On: Let Them Eat Cake
Pink Elephant: Something with Dots, Punch, and Tag
Whimsy Stamps: The Eyes Have It - use eyelets
Pollycraft Challenge: Pick 2 of the following - Snowflakes, Sparkle, Spots, Stripes, Swirls
2 Sketches 4 You: Sketch to the right
Just Buggin: Use any die cut, but alter it
Practical Scrappers: Use any die cut
One Stop Craft Challenge: Use any die cut


I embossed the background with the Cuttlebug Swiss Dots folder, and randomly added pink stickles to some of the dots for some sparkle.

The tree was cut from the Cricut Stretch Your Imagination cartridge, and the swirly pattern embossed in the top of the tree was from with the Cuttlebug Victoria folder.

The cupcakes were from the Cricut Doodlecharms cartridge. Of course I had to add some bling with the little gems on the cupcakes.

I used 3 different punches for the layered edging. The dark pink was actually a corner punch that I turned . The light pink in the middle was cut with a Fiskars punch (not sure of the name). The bottom edging was made with the Martha Stewart lace punch.

I cut the tag for the sentiment with the Cricut George cartridge. Then I added an eyelet so that I could tie the tag to the tree with some pink hemp cord. I added some pink glass beads to the cord just for an extra little detail.

At the top I used 2 large eyelets and tied a knot with pink grosgrain ribbon. I also decided to make the entire card shaped like a big tag - I love how that looks!

Thanks so Much for Looking!

{If Cupcakes Details}
cardstock: Bazzill Basics
Tree cut from Cricut Stretch Your Imagination
Cupcakes cut from Cricut Doodlecharms
Small tag cut from Cricut George cartridge
Background embossed with Cuttlebug Swiss Dots folder
Tree embossed with Cuttlebug Victoria folder
Sentiment printed using Cheri font
Punches: Martha Stewart lace edge punch, Fiskars edge punch
Misc: eyelets, grosgrain ribbon, multi-colored pink ribbon, gems

Sunday, September 27, 2009

Super Sketchy Sunday

It is Super Sketchy Sunday over at 365 Cards. Here is the sketch for today:

And here is my card:


The stamps are from the Papertrey Ink Everyday Button Bits set.

I cut the clouds using the Cricut Indie Art cartridge. The sun is from the Doodlecharms cartridge.

I searched my stash for a variety of buttons.

Thanks for Looking!

Saturday, September 26, 2009

Some-birdie is thinking of you...

I needed a birthday card, and the Cardpatterns sketch this week was perfect! Challenge #48 over at One Stop Craft challenge is to use Die Cuts. Well I am a huge fan of die cuts, electronic cuts, any kind of cut! I opted to use my Cricut for this one - I hope that is okay since it is technically not a die cut.

Here is the sketch:

And here is my card:


I printed the sentiment using the Riesling font, which I found here. The little tag is from the Cricut George cartridge.


The little birdies and the branches were cut using the Cricut Home Decor cartridge. If you look closely, you will also see that I stamped the cream background with a leaf pattern using embossing ink, and I heat embossed with clear embossing powder. Then I inked slightly to bring out the leaves.


I tied the ribbon and then secured with some hemp cord. I added the glass beads for an extra little detail.


On the inside of the card, I have the Happy Birthday sentiment.

Thanks so much for Looking!

{Some-birdie is thinking of you Details}
Solid cardstock: Bazzill Basics
Patterned Cardstock: K&Company, Amy Butler
Leaf Stamp for background: Stampology Autumn Leaves
Big and Bossy Clear Embossing Pad
Whispers Clear Embossing Powder
Edges inked with Stampin Up Chocolate Chip Ink
Misc: Grosgrain Ribbon, button, glass beads, gems

Friday, September 25, 2009

Special card for a friend

Well the theme over at 365 cards, day 209 happens to be "It's a Jungle Out There." However, I really needed a Bear card. Do bears live in the jungle? I am thinking they don't, but my 8-year old has already gone to bed, so I can't ask him.

Anyway, here is my bear card:
I stamped the background with a leaf stamp using clear embossing ink. Then I heated with clear embossing powder. That makes a nice shiny pattern on the back.

I had to get a Moon and a Bear on this card. I know there is one person that checks my blog who will know who this card is for (wink! Please don't tell him - I will give it to him on Monday).

I used the Cricut Camp Out cartridge for the moon and bear cuts. The frame is from Storybook.

Then I strung some cord with glass beads. On the inside, I made up this long poem about the moon and bears, and I got some funny little rhymes in there. I am including a picture of the inside with the poem. I know it is corny, but there are a bunch of inside jokes all through this poem. The recipient will get a chuckle. You can click on the picture below to see a larger view of the poem (and I use that term very loosely - LOL!)

Thanks for Looking!

Thursday, September 24, 2009

Pink Explosion!

It's Colour Create Time! Woo hoo! For this challenge, the sponsor is Simon Says Stamp. Please go check them out if you get a chance - they have so many new products this month!

The colours for this challenge were chosen by Di, and they are hot pink, dusky pink and ice chocolate:

Wow - look at that inspiration photo! Yum! The extra options for this challenge are pearls and swirls.

Well I just love these colours! They are fabulous! So I have lots and lots to post for you - I just couldn't stop!

First up - I made a cupcake card to go with the cupcake inspiration picture!


That fancy frame is one of my favorites! It is from Cricut Storybook cartridge. I also stamped some swirls on the background chocolate cardstock, and I heat embossed with clear embossing powder. It almost looked like melted chocolate when it was done!


I added some pearl gems to the cupcake and also to the corners of the frame. The cupcake still seemed to be lacking something, so I added a little ribbon.


I thought that sentiment was just too cute! I printed it on my computer, and then added some bits of ribbon on the edges.


Finally a bow on the corner! I know it is large - I was having fun adding layers to it and kind of got carried away! Ha ha!

Ok, after I made the cupcake card, there were lots of scraps, so I whipped up a little holiday card:
I know these colors aren't traditional holiday colors, but I made a similar card a couple of weeks ago, and I really liked the clean simple layout.

The stamps are from the Papertrey Ink Sign Language set! Love that set! I added some tiny little pearls as accents on the stamps. I embossed a box around the stamps just to set them off a little.


The last detail is another bow that is too big - I know I know! I actually tried to remove it, but when I put a card together, it is meant to last, and I just couldn't get it apart without ruining it.

Finally, I decided to try my hand at a little card box:


I mimicked a box I saw on Lauren Meader's blog. But I used my Cricut - mostly shapes from the George cartridge, but those swirly edges are from the Storybook cartridge. The actual cut file still needs ALOT of work - some of the edges aren't fitting together as cleanly as I would like. The flower on the front is from the Walk in My Garden cartridge, and the embossed swirls are from the Cuttlebug Swirls folder.

These are the little cards for the box. I don't know how practical they are, but they sure did turn out cute! These were a set of DCWV 3"x3" cards (10 cards in the pack, but I could only fit 8 in the little box). I decorated each of the fronts differently and also stamped a coordinating envelope. I gave this little card box to a dear friend of mine and she loved it!

Have fun with the challenge! I will be around to check as many of your submissions as I can!

Don't forget to check out the other design team members stunning creations! These ladies are super talented and will give you lots of inspiration!

Thanks for stopping by!

Tuesday, September 22, 2009

Buttons Buttons Who's got the Buttons!

Whimsy Stamps is having a button challenge this week! I love buttons so I just couldn't pass that up! I also happen to be checking out Bitten by the Bug this week, and the challenge over there is to use the dragonfly cut from the Camp Out cartridge.

I made this first card for both challenges:
I got this pretty blue satin ribbon on clearance and just had to use it! I stamped the background using Papertrey Ink Background Basics Text Style. Then I sewed the stamped background to a piece of chocolate colored cardstock.

I layered the dragon flies using the shadow cut and the main cut. Then I added the wings on top but only adhered them in the middle for some added dimension.


My son wanted to make a card with me last night. Every now and then he likes to do that. So he checked out all of the challenges, and decided on the buttons. So this card is just for the Whimsy Stamps challenge. Here is his card:

He picked out the stamp and the colors and I helped pick out the patterned paper. We practiced once before he stamped the image and the sentiment - I think he did great with that! That stamp is a from Papertrey Ink Everyday Button Bits set.

We embossed the teal and tan paper with a Cuttlebug folder, and we put pigment ink on the folder. Then after it was embossed, we added some sparkly embossing powder and my son heated it with the heat gun. He really wanted to use the heat gun, so that is why we used that technique. I used a Fiskars edge punch on the teal cardstock.

The final detail on this card that I must point out is the bow. I struggle with bows everytime I try to make one. So he wanted to make the bow, and I thought that was a great idea! He tied that bow perfectly! WOW! I tightened it up for him, but he is the one who tied it. I told him he was now in charge of all bows on my cards!

{Thanks So Much Details}
Solid Cardstock: Best Occasions textured cardstock
Background Stamp: Papertrey Ink Background Basics Text Style
Dragonflies cut from Cricut Camp Out cartridge
Misc: Buttons, satin ribbon

{Enjoy the Ride Details}
Solid Cardstock: Bazzill Basics
Patterned cardstock: K&Company
Embossing with Cuttlebug Stylized Flowers folder.
Misc: grosgrain ribbon, buttons

Sunday, September 20, 2009

Hey Chick!

I decided to participate in the Cardpatterns challenge this week. Here is the sketch:


And here is my card:
The image was actually a free download from Pink Petticoat that you can get here.

I also printed the patterned papers and the background pistachio colored paper from Pink Petticoat, but those weren't part of the free download. I cut the sentiment using Nestabilities Labels dies.

I added stickles to the little chick and the gems for some sparkle.

The knot seemed plain, so I crocheted a little flower in the yellow and light green colors as a final embellishment.

Thanks for Looking!


{Hey Chick Details}
Pink Cardstock: Bazzill Basics
Green / patterned cardstock: Pink Petticoat Lola's Boudoir printed on cream Bazzill Basics
Sentiment cut using Nestabilities Labels dies
Miscellaneous: hand crocheted flower using embroidery floss, gems, grosgrain ribbon, button

Wednesday, September 16, 2009

Fall Colors

I decided to participate in the Belli Challenge this week where the theme is Fall or Halloween. And I used Kazan's Sketch #35 from 2 Sketches 4 You. If you get a chance, head on over to both of those blogs - they are offering some fantastic prizes this week!

Here is the sketch:
And here is my entry:

This card actually came together pretty quickly. I cut all of the images on my Cricut - the leaves are from the Doodletype cartridge, and the tree is from Stretch Your Imagination.

I embossed the background using the Cuttlebug Leafy Branch Embossing Folder. I printed the sentiment on my computer using Bradley Hand ITC font.

I used some foam stickers to mount the leaves for some added dimension. Finally I put some little gems in the tree, because I just gotta have bling!

Thanks for Looking!

{Autumn Details}
Cardstick: Bazzill Basics and DCWV
Embossing: Cuttlebug Leafy Branch embossing folder
Leaves cut with Cricut Doodletype cartridge
Tree cut with Cricut Stretch Your Imagination cartridge
Misc: gems, grosgrain ribbon

Going Digital

Two challenges today - Mojo Monday and Whimsy Stamps - I will give the details below. First off, here is my card:


Whimsy Stamps: Fun Fall Colors - any colors that remind you of fall
Mojo Monday: Sketch to the right

I decided to try something a little different for this challenge. I absolutely LOVE Pink Petticoat digital stamps, and I have used their digital stamps before. But I have never used the background papers. So for this challenge, I printed the colored background papers (the black base is just a standard piece of Bazzill Basics cardstock). What a fantastic alternative to buying a lot of patterned papers! I may be hooked!


Don't you just love this new Halloween set? That little tree with the owl on the top is just too cute! Incidentally this set is huge - there are so many images and patterns and colors - it is just fantastic! And I really like the muted colors of the backgrounds!

I decided not to color the image - just add some halloween colored gems to the tree.


I sewed on the gathered ribbon - haven't done anything like that in awhile. And I added some little black gems in some of the swirls on the background.

Keep an eye out - I suspect I may be using more Pink Petticoat this week!

Thanks for Looking!